
DOWNLOAD


INSTALL
This is the installation procedure for the download file.
1:(Download Win X64) button to download the zip.
2: Right-click and extract zip.

3: The following files are included.
-
AZTOKE_BRONZE-1.0.*: Installer (the latter number varies depending on the version)

*If you double-click the installer while Reaper is running, a pop-up will appear.
Please close Reaper before proceeding.

4: Double-click the installer (.exe) to open the setup window.
Click "Next"

5: Please confirm the terms of service and click "Agree".

6: The sws installation screen will appear.
If you have not installed it, please check the box.
Press "Next".
7: You can specify the installation location.
Press "Install".
8: Installation is complete.
Press "Next".
9: This completes the setup.
Press "Finish".
-
1: Restart Reaper
Select "Open action/action list"

2: Select New Action / New ReaScript


3: Set any file name and file type
Select "Lua files(*.lua)" and generate the file

4: Enter [AZ_] and a list will appear.
It can be determined that API can be used.![4: Enter [AZ_] to display the list.](https://static.wixstatic.com/media/daf646_b8ca4d7b5d9f41d49e783e29543e5fc2~mv2.jpg/v1/crop/x_0,y_8,w_825,h_470/fill/w_825,h_470,al_c,q_85,enc_avif,quality_auto/Reaper_Lua_api.jpg)
5: From here on, feel free to use the API to create your own.
We will publish Lua Script/API documentation every Wednesday.
Please read the following page.BookMarkThank you.
1: Install python.
https://www.python.org/
2: Get the installer for the 3.7.X version of python.
*This version is recommended for future Wwapi etc. 3.7.X.

3: Install now with Install Now.

4: C:\Users\○○\AppData\Local\Programs\Python\Python37
Check if python37.dll is in the above folder.

5: Launch Reaper and open Options Preferences.

6: ReaScript/Python
-Enable: ☑
-Python.dll Custom path: Folder path where the dll is located"C:\Users\○○\AppData\Local\Programs\Python\Python37"
-python.dll :python37.dll

7: Open action/action list
8: Select new action/new ReaScript
9: Set any file name and select the file type as "Python files (*.py)" to generate the file

10: Enter [AZ_] and a list will appear.
It can be determined that the API can be used.
![10: Enter [AZ_] to display the list.](https://static.wixstatic.com/media/daf646_29f377d0a91f489991007c648b4c4228~mv2.jpg/v1/fill/w_825,h_479,al_c,q_85,enc_avif,quality_auto/Reaper_Python_api.jpg)
11: From here on, feel free to use the API to create your own.
We will publish Lua Script/API documentation every Wednesday.
Please read the following page.BookMarkThank you.
Windows
Mac
1: (Download Mac OS) Press the button to download the zip.
2: Right-click and extract zip.

3: The following files are included.
-
AZTOKE_BRONZE-1.0.*: Installer (the latter number varies depending on the version)

4: Double-click the installer (.pkg) to open the setup window.
Click "Continue"

5: This will be the license agreement page. Please click "Continue"

6: Please confirm the terms of service and click "Agree".

7: You can specify the installation location.
Press "Install".
8. Enter your Mac password and click "Install Software"

9: Installation is complete.
Press "Next".
For other frequently asked questions, please click here
-
1: Restart Reaper
Select "Open action/action list"

2: Select new action/New ReaScript

3: Set any file name, select the file type as "Lua files (*.lua)" and generate the file

4: Enter [AZ_] and a list will appear.
It can be determined that the API can be used.
![4: Enter [AZ_] to display the list.](https://static.wixstatic.com/media/daf646_e8f4047113ef4840a4ec28577ea47acd~mv2.jpg/v1/fill/w_980,h_872,al_c,q_85,usm_0.66_1.00_0.01,enc_avif,quality_auto/daf646_e8f4047113ef4840a4ec28577ea47acd~mv2.jpg)
5: From here on, feel free to use the API to create your own.
We will publish Lua Script/API documentation every Wednesday.
Please read the following page.BookMarkThank you.
1: Install python.

2: Get the python 3.7.X or later version installer.
*This version is recommended for future Wwapi etc. 3.7.X.
*If you are using an M1 Mac, please obtain the one labeled "universal2 installer".

3: Run the obtained installer and install it.


4: /Library/Frameworks/Python.framework/Versions/(version)/lib
Check whether libpython(version).dylib is included in the above folder.

5: Launch Reaper and open "REAPER" >"Preference".

6: ReaScript/Python
-Enable: ☑
-Python.dll Custom path: Folder path where the dll is located
"/Library/Frameworks/Python.framework/Versions/(version)/lib"
-python.dylib: python (version)
Select OK and restart Reaper.

7: Open action/action list
8: Select new action/new ReaScript
9: Set any file name and select the file type as "Python files (*.py)" to generate the file
*The file name must be entered up to ".py".

10: Enter [AZ_] and a list will appear.
It can be determined that the API can be used.
![10: Enter [AZ_] to display the list.](https://static.wixstatic.com/media/daf646_65d76464ad734e0b9ea5c6265c0d8cd0~mv2.jpg/v1/fill/w_980,h_742,al_c,q_85,usm_0.66_1.00_0.01,enc_avif,quality_auto/daf646_65d76464ad734e0b9ea5c6265c0d8cd0~mv2.jpg)
11: From here on, feel free to use the API to create your own.
We will publish Lua Script/API documentation every Wednesday.
Please read the following page.BookMarkThank you.
Mac
1: Member registration
For an administrator to grant permissions to a user, the user must also be registered as a member.
Select Log In.

2: If you are new, select Sign Up here.

3: When the sign-up screen appears, choose your preferred method. You can sign up with Google, Facebook, or an email address.

4:ログインのアイコンの箇所とプルダウンの選択にこのように書かれていればアカウントの生成は成功です。

5: Set an admin password for RIGDOCKS.
A dedicated password is registered separately for RIGDOCKS.
Setup URL:https://www.azstoke.jp/rigdocks/rigdocksbridge-connect

6: Download RIGDOCKS Bridge.
Choose Windows or Mac according to your PC's OS.
Download RIGDOCKS Bridgehere
The following instructions use Windows.

7:RIGDOCKS BridgeのZipファイルがダウンロードされます。
そのRIGDOCKS BridgeのZipファイルをすべて展開します。

8:展開したBridgeファイルをダブルクリックしてインストールを実行

9: The installer window will open; select "Next".

10: Review the license agreement
and if everything looks good, select "Agree".
You can also review it on our website.
Full terms:https://www.azstoke.jp/rule
11: Installation will run.
Once complete, "Next" becomes selectable — select it.


12:インストールが実行されます。
完了すると「次へ」を選択可能になるので選択します。
13:RIGDOCKSがインストールされているのでアプリを検索します。
RIGDOCKS Bridgeアプリが見つかったらダブルクリックして立ち上げます。


14:RIGDOCKS Bridgeアプリにメールアドレスとパスワードの設定ができます。
メールアドレス:ホームページのアカウントで設定したメールアドレス
パスワード:項目5で設定した管理パスワード

15: When you successfully log in to the RIGDOCKS Bridge app, the following pop-up appears.

16: Install the plan owned by the administrator user.
*The installation steps are the same as for RIGDOCKS Bridge.

17:追加ユーザーの設定は以上です。
利用には、追加ユーザーの設定後に管理者ユーザーから追加ユーザーの権限付与で利用できるようになります。
管理ユーザーの権限付与は次の項目の管理者ユーザーの設定をご確認ください。
1: Administrator account login
Select RIGDOCKS-License on the login screen of the user (administrator) who holds the RIGDOCKS license.

2: Select Add User under Sharing Users
Choose which license permission to grant for the BRONZE/SILVER/GOLD licenses you hold, and add users per plan.
Example: the screen shown here is for adding a BRONZE user.

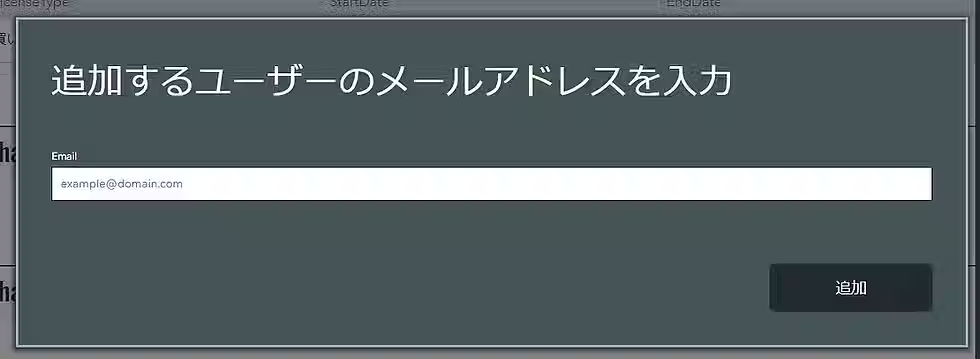
3: Enter the email address of the user to add
Enter the email address of the user you want to add and select the Add button.
*This requires the "additional user setup" to be completed first.
4: The added user appears in Sharing Users
If the added user's email address is displayed, the license has been granted successfully.

5: Remove a user added to Sharing Users
A delete button appears next to the added user's email address; select it to remove the account.
After deletion, the user is listed under Shared Users, confirming the removal succeeded.

What is RIGDOCKS Bridge?
This is a license authentication app.
Please install it when using APIDOCK-SILVER-.
=Basic functions=
- User license authentication
- Active device license authentication
=Functions to be added=
- Grant permissions to specified users using MultiUseLicense
I installed the app but I don't know where it is
Please search for "RIGDOCKS Bridge" on your PC and it will appear.
APIDOCK is no longer available
1. Please install RIGDOCKS Bridge
2. Once you have authenticated with RIGDOCKS Bridge, you can use it even when your PC is offline
- You will need to authenticate again the next time you are online
- If you are offline for more than 30 days, you will no longer be able to use it


