top of page


RADNODZ User Instructions
1: Installing the RIGDOCKS plugin (RADNODZ)
Download and install the RIGDOCKS plugin (RADNODZ) from here .
* A plan purchase is required to use this feature.
2: Installing the Unreal Engine plugin
Download the Unreal Engine plugin from here .
- [Plugin] If you want to obtain it from GitHub
- [plugin Zip] If you only need the zip file
*This requires building the project, so it cannot be used with projects that only use Blueprints.
Create a folder called "Plugins" within your Unreal Engine project folder, and place the unzipped folder inside it.
*As an example, we are using a project called [PlugTest].

After installing the plugin, when you open your Unreal Engine project, you will be asked if you want to build it, so proceed by clicking OK.

If you find RADNODZ under "Edit" > "Plugins" in Unreal Engine Editor and it's checked, then you can use it.


In the "Extensions" tab of Reaper
If "Not Activated" is displayed under RIGDOCKS > RADNODZ > License, the license has not been activated.
If you have a license, please click the License item and activate it.1: Click the License item.

2: Authenticate according to the dialog box.


3. If "Activated" is displayed in the License section, then it's OK.

4: Perform license authentication for the rank that will use the API.
*The following are the rank versions that can be used in RADNODZ.
・BRONZE 3.0.0~
・SILVER 2.0.0~
・GOLD 2.0.0~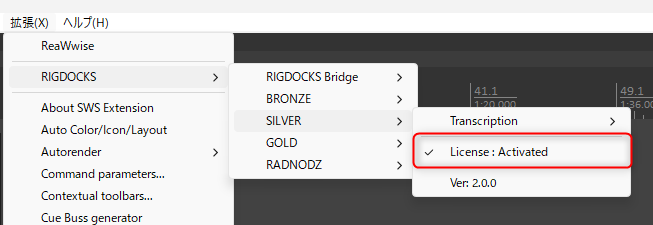
5: Set the execution PC to the machine currently in use.
RIGDOCKS can only run on one machine per account at a time, so you need to set the PC using RADNODZ as the machine to use.
If "In use on this machine" is checked, it is set as the machine to be used.
If the item is not checked, clicking it will switch to the machine being used.


Specify the IP address/port on which the server will listen. The currently configured IP address/port is displayed after "Running:" or "Stopped:".
• Running: The server is currently running.
Stopped: The server is down.
*If you close and reopen Reaper, the previous state will be restored.
*To avoid security risks, it is recommended to stop the server when not using RADNODZ's functions.

1: Specify IP/port
IP
- 0.0.0.0: For connections from within the network. - 127.0.0.1: For connections only from within the same PC. Port - Any value within the range of 0 to 65535. However, ports already in use by other programs cannot be used.

2: Starting/Stopping the Server
- Start/stop the server using Start Server/Stop Server.


3: Check the PC's IP address.
- When connecting from another program on the same PC, the IP address will be " 127.0.0.1 ".
- When connecting from another device, specify an IP address within the PC's network.
You can obtain it using AZ_GetLocalIpAddresse().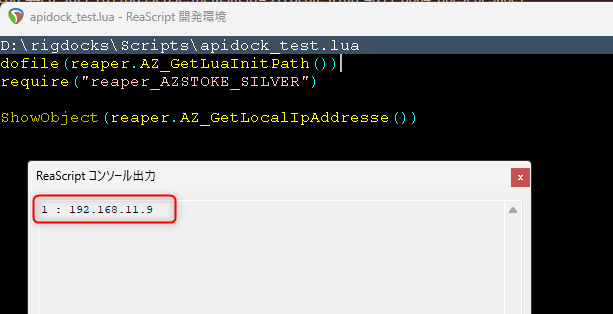
1: Create a RadnodzClient class and execute Connect.
Create a RadnodzClient class object using Create Radnodz Client.
This object is required when executing the RIGDOCKS API, so we recommend assigning it to a variable.
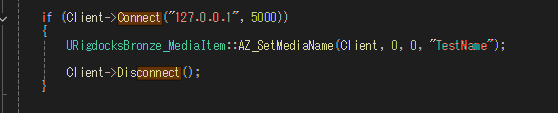
Execute the Connect function of the RadnodzClient class.
Specify the IP address of the destination in the "IP" field and the port of the destination in the "Port" field.
The return value indicates whether the connection was successful or not.
2: Execute the RIGDOCKS API
Specify the RIGDOCKS API.
Specify the RadnodzClient class created in step 1 as the Client argument.
*If not specified, an error will occur during the build process.
The image shows an example of executing AZ_SetMediaName.
3: Disconnect
The API will disconnect from the RADNODZ server at the end of its execution.
The RIGDOCKS API can be executed from the time Connect is executed until Disconnect is executed.
1: Create a RadnodzClient class and execute Connect.
Create a RadnodzClient class object using Create Radnodz Client.
This object is required when executing the RIGDOCKS API, so we recommend assigning it to a variable.
Execute the Connect function of the RadnodzClient class.
Specify the IP address of the destination in the "IP" field and the port of the destination in the "Port" field.
The return value indicates whether the connection was successful or not.
2 : Execute RIGDOCKS API
Specify the RIGDOCKS API.
Specify the RadnodzClient class created in step 1 as the Client argument.
*If not specified, an error will occur during the build process.
The image shows an example of executing AZ_SetMediaName.
3: Disconnect
The API will disconnect from the RADNODZ server at the end of its execution.
The RIGDOCKS API can be executed from the time Connect is executed until Disconnect is executed.
When performing network communications other than those within the same PC, it is recommended to enable TLS.
When TLS is enabled,
- Restrictions on connections from devices other than those pre-registered. - Prevention of spoofing of the connected PC. - Encryption of communications.
1: Enable TLS on the Reaper side.

2: Record the server fingerprint.
Here, you will configure your account settings to manipulate your spreadsheet using the RIGDOCKS API.
*Google Cloud Console is a developer management interface provided by Google.
*Please prepare your Google account in advance.

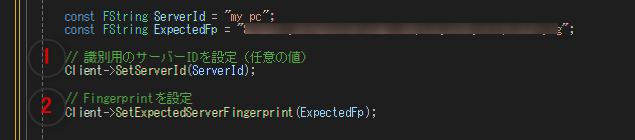
3: Register the Server Fingerprint on the device.
Before connecting, the application on the device performs the following steps to register the Fingerprint string with the application on the device.
To share the fingerprint string with your device, please use Slack, a spreadsheet, or a similar tool.
4: Obtain the application's public key.
The app on the device performs the following steps before connecting: generate a key and obtain the public key.
The text of the acquired public key will be output to a text box or otherwise made copyable.


5: Save the public key to a file.
The public key generated by the app on the device is saved to a file on the PC where Reaper is running.
To share your public key with your PC, please use Slack, a spreadsheet, or a similar tool.

6. Register your public key with Reaper.
Press the Register Client Key button and specify the file you created in step 4. Then, enter a desired registration name and press OK to register the terminal.
A list of devices registered under Authorized Clients will be displayed.


7: Make a connection
Here, you will configure your account settings to manipulate your spreadsheet using the RIGDOCKS API.
*Google Cloud Console is a developer management interface provided by Google.
*Please prepare your Google account in advance.
bottom of page