
[Reaper x UE5] I created an app to control Reaper using RIGDOCKS' RADNODZ feature! [Tracklist Acquisition Edition]

table of contents
Retrieve and display information about Reaper.
In the previous article , we connected Unreal Engine to Reaper and executed a simple API. Now we are ready to interact with Reaper.
In this article, we will start creating the internal workings of the application that controls Reaper.
As a first step, we will retrieve a list of tracks and media items placed in Reaper and display them as items on the Unreal Engine screen.
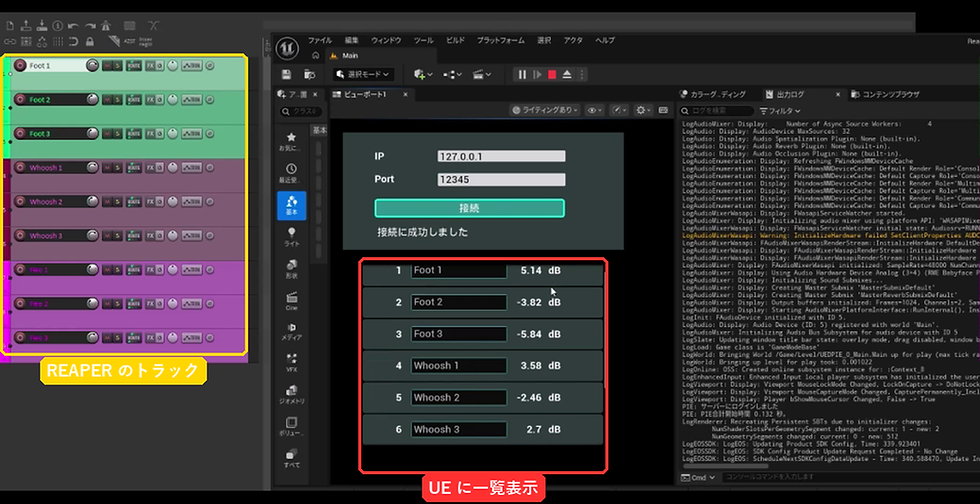
Preparation
The AZ_GetTrackListDetail API we'll be using this time is for SILVER rank. We'll enable the RigdocksSilverPlugin, which was commented out last time.
Source/ReaperController/ReaperController.Build.cs
PublicDependencyModuleNames.AddRange(new string[]
{
    "Core", "CoreUObject", "Engine", "InputCore",
    "UMG", "Slate", "SlateCore",          // UMG を C++ から触るのに必要

    "RadnodzClientPlugin",                // 接続クライアント(必須)
    "RigdocksBronzePlugin",               // BRONZE の API
    "RigdocksSilverPlugin",               // ← 今回追加:SILVER の API(トラック操作)
    // "RigdocksGoldPlugin",
});
UI changes (WBP_RadnodzDemo)
The screen I created last time looked like this:

We will modify this to create the screen we are currently working on.

First, we'll change the designer of the main screen, WBP_RadnodzDemo. The finished product is shown here.

The main changes from the previous version are as follows:
# | Changes | Part name |
① | Change the RenameButton to a Connect Button (and change the label to "Connect" as well). | ConnectButton/ConnectionLabel |
② | Add a scroll box to display the track list. | TrackList |
— | The NameTextBox, which is the input field for the new name, will not be used this time, so it will be deleted. | — |
IpTextBox / PortTextBox / StatusText will remain the same as before.
① Connect Button
I renamed the previous RenameButton to ConnectButton, changed its child Text Block to ConnectionLabel, and set the displayed text to "Connect".
As before, after naming it, make sure to check the "Is Variable" box at the top of the details panel.

② Tracklist
Search for Scroll Box in the palette and place it on the canvas. Name it TrackList and also check the Is Variable option.
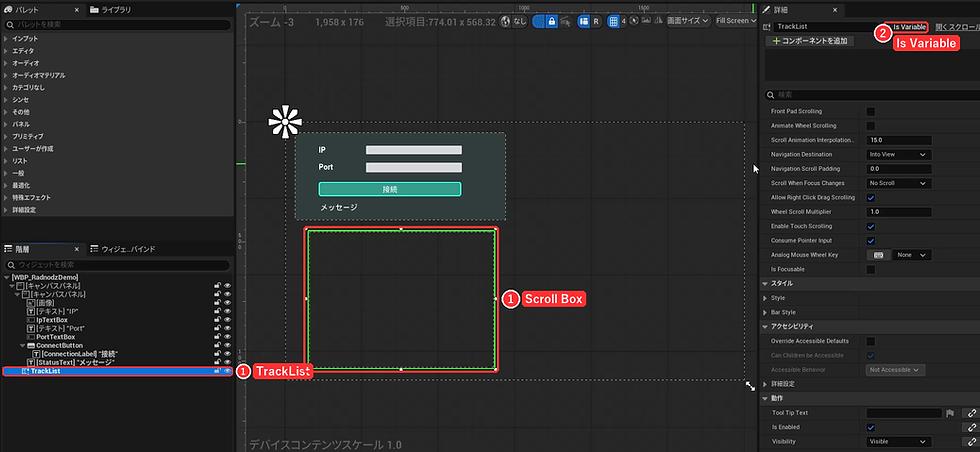
A Scroll Box is a box that allows you to arrange items vertically, and scrolls to view anything that overflows. Even in projects with many tracks, you can scroll to see anything that exceeds the size of the box.
For now, we'll leave it empty. The contents (one row of cards on the track) will be added by the program when the button is pressed.
Click Compile → Save to proceed.
Create a widget for one track row (WBP_TrackCard)
We create a separate widget to represent the appearance of one row of the track list. This is then used as a "template," and we generate as many of these as there are tracks, arranging them in the TrackList.
*If you directly place Text Blocks within WBP_RadnodzDemo, you will need to recreate it every time the number of tracks changes. By cutting out one line as a component, you can separate the roles so that only WBP_TrackCard is responsible for visual adjustments, and the arrangement process remains the same regardless of the number of tracks.
① Create a Widget Blueprint
We'll create it using the same procedure as when we created WBP_RadnodzDemo last time .
Right-click in the Content Browser → User Interface > Widget Blueprint
The parent class is User Widget
The name is WBP_TrackCard
② Arrange the parts
The hierarchy is structured as follows:

# | Part name | kinds | What to display |
① | Index Text | Text Block | Track number |
② | TrackNameText | Editable Text Box | Track name |
③ | VolumeText | Text Block | Volume (dB) |
The key points are as follows:
Horizontal Box is a horizontal version of the Vertical Box we used last time. It arranges the number, name, and volume in a single horizontal row.
By fixing the width of each column using a Size Box, the columns will align even if the track names have different lengths.
For items ①, ②, and ③, you will be writing values to them from the program, so make sure to give them accurate names and check the "Is Variable" option. These names will be used directly in C++.
③ Improve the appearance of the cards.
The outermost CardBackground (Border) is used to create the card's background.

② Set Padding to 8.0 to create a margin inside the card.
③ Set the Brush's Draw As to Rounded Box to round the corners.
You can adjust the spacing and colors of the cards here. The changes you make here will be reflected in all generated rows. This is the advantage of using a template.
④ Create a variable to receive track information.
The WBP_TrackCard receives and displays "information for one track". We will create a variable to store this information.
Switch to the graph tab in the upper right corner.
In MyBlueprint, add a variable using the + button under Variables, and name it trackDetail.
① Select Track Detail (structure) as the variable type.
In the details panel, check the boxes for ② Instance Editable and ③ Expose on Spawn.
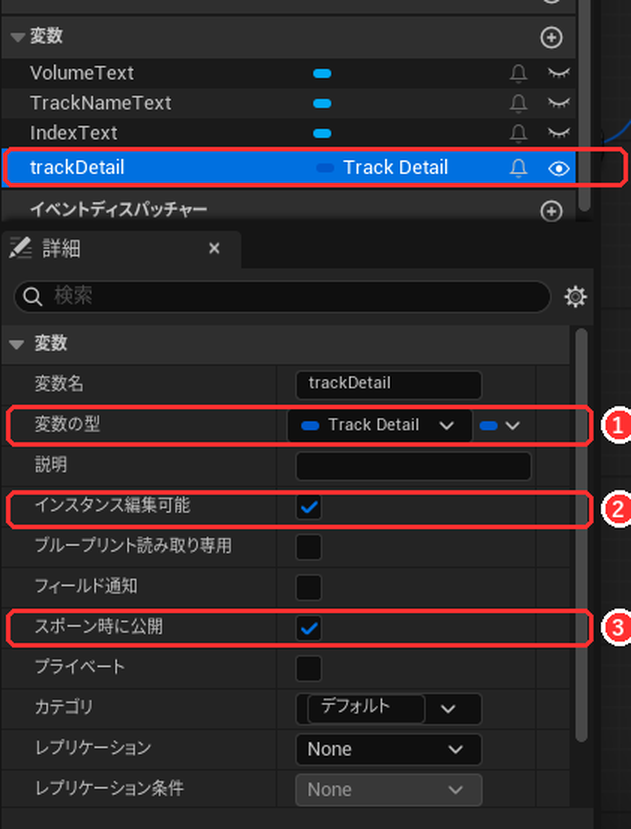
Track Detail is a structure provided by RADNODZ, and it contains information for a single track returned by AZ_GetTrackListDetail. Its contents are as follows:
member | type | Content |
Name | String | Track name |
Track | Games Track | A reference to the actual truck (which can be passed to other APIs). |
Volume | double | Volume (dB) |
Index | Integer | Track number ( 0-based ) |
Depth | Integer | Folder hierarchy depth |
*Why is it necessary to make it public at spawn time? Checking this box will add a Track Detail input pin to the Create Widget node. This allows you to "pass the track information to be displayed at the moment the card is created."
⑤ Display the received information
From Event PreConstruct, the contents of trackDetail are written to three parts.
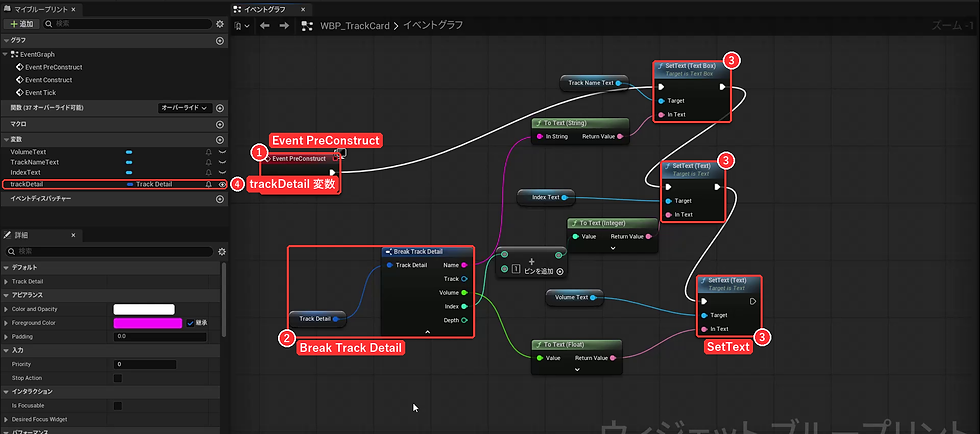
# | node | role |
① | Event PreConstruct | Called just before the widget is assembled. |
② | Break Track Detail | Break down the structure into its individual members (drag from the pin in trackDetail → add with Break). |
③ | SetText ×3 | Write values to each part. |
④ | trackDetail variable | Variables created in 4-4 |
Since the index is 0-based, we add +1 (an Integer addition node) before displaying it. This is to align it with the track number on the REAPER screen.
*Reason for using Event PreConstruct: PreConstruct is also executed in the designer, so if you put initial values in trackDetail, you can adjust them while checking the appearance in the editor.
Click Compile → Save. The template is now complete.
[Blueprint Version] Display Tracklist
Return to WBP_RadnodzDemo and configure the process in the Graph tab. The whole thing is divided into five blocks.
block | Content |
Message initialization | Clear StatusText at startup. |
Press the connect button. | When the button is pressed, the system will execute "Connect → Get" and then "Disconnect" in sequence. |
Connection process | Almost the same as last time |
Get tracklist | This is the main part of this process. Arrange AZ_GetTrackListDetail → WBP_TrackCard. |
Cutting | Disconnect if currently connected. |
*The nodes you previously built using On Clicked (RenameButton) will no longer be usable once you rename the button. Delete any unnecessary nodes and rebuild them using the following steps.
① Message initialization
In the designer, the StatusText field is temporarily set to "Message," so we'll leave it empty when the screen is displayed.

② Press the connect button
Select ConnectButton in the designer and add an event using the + next to OnClicked at the bottom of the details panel (the same procedure as last time).

The Sequence node executes the connected processes in order from top to bottom. Then 1 is executed after the process in Then 0 has finished.
This creates a process of "connecting, retrieving a list, and finally disconnecting."
*The macro "Error Display" in ④ is a collection of processes that display the reason for failure in StatusText. Since it is used many times for connection failures, etc., it is recommended to make it a macro in MyBlueprint using the + button to make the graph cleaner (it is equivalent to the C++ version of DisplayError()).

# | node | role |
① | Get Error | Retrieve error information from the most recent API call. |
② | Break Rigdocks Error | Error Code Message Detailed Breakdown |
③ | Append | Concatenate the strings. Replace B/D with a space. |
④ | SetText | Displayed in StatusText |
③ Connection process
This is pretty much the same as last time .

# | Content |
① | If the client is not Valid |
② | Create a Radnodz Client using Create Radnodz Client and set it to the Client variable. |
③ | Connect using the values in IpTextBox / PortTextBox |
The branching logic depends on the connection result.

# | Content |
① | The return value of Connect is Branch |
② | Success (True): The StatusText displays "Connection successful" and proceeds to retrieve the track list. |
③ | Failure (False): The macro "Error Display" will show the reason for the failure. |
④ Obtain the tracklist
The process of retrieving the track list is initiated from the successful SetText call.

① Clear Children (Empty the list)
Drag TrackList onto the graph and add Clear Children from the pins. This prevents the previous card from being added while you're pressing the button twice.
② AZ_GetTrackListDetail (Retrieves track information in bulk)
Right-click → search for AZ_GetTrackListDetail and add it (it's located under RADNODZ > SILVER > Track).
pin | Things that connect |
Client | client variables |
Project | Still disconnected (i.e., the project currently open in REAPER) |
Return Value | Array of Track Detail |
AZ_GetTrackListDetail returns the names, volumes, and numbers of all tracks in a project in a single call .
*Reasons for using AZ_GetTrackListDetail:
RADNODZ also has APIs like AZ_GetTrackItemList (to get a list of tracks) and APIs to get the name and volume of each track. However, combining these would result in communicating with REAPER as many times as there are tracks multiplied by the number of items: "get the track list → get the name of each track → get the volume...". Since RADNODZ uses one API call for one communication, the number of communications directly translates to waiting time. In situations where you want "all the information," such as when displaying a list, it is more efficient to use AZ_GetTrackListDetail, which returns all the information at once.
③ For Each Loop (processing the array one element at a time)
Drag from the Return Value pin to add a For Each Loop. The Loop Body will be executed for each element of the array (i.e., one track).

④ Create Widget (Generate WBP_TrackCard)
Add a Create Widget from Loop Body and select WBP_TrackCard as the Class . The node name will then change to Create WBP Track Card Widget, and a Track Detail input pin will be added.
Connect the Array Element of the For Each Loop to this Track Detail pin .
⑤ Add Child (Add to list)
The generated card will be added to the TrackList. Connect the TrackList to the Target of Add Child and the Return Value of Create Widget to the Content.
This completes the process of "duplicating the template for each track, passing track information to each one, and then listing them."
⑤ Cutting
Starting from Then 1 in the Sequence, if a connection is currently established, it will be disconnected.

After clicking Compile → Save, the Blueprint version is complete.
[C++ version] Displaying the tracklist
We will write the same process in C++. We will modify the URadnodzDemoWidget we created last time and create a new C++ class UTrackCardWidget for WBP_TrackCard.
① Create a TrackCardWidget class.
In the UE editor, go to Tools > New C++ Class and create a class named TrackCardWidget , with UserWidget as its parent.
TrackCardWidget.h

#pragma once

#include "CoreMinimal.h"
#include "Blueprint/UserWidget.h"
#include "DataClass/FTrackDetail.h"         // FTrackDetail(SILVER)
#include "TrackCardWidget.generated.h"

class UTextBlock;
class UEditableTextBox;

UCLASS()
class REAPERCONTROLLER_API UTrackCardWidget : public UUserWidget
{
	GENERATED_BODY()

public:

	UFUNCTION(BlueprintCallable)
	void SetTrackDetail(FTrackDetail trackDetail);

	/** トラックのインデックス */
	UPROPERTY(BlueprintReadWrite, meta = (BindWidget))
	TObjectPtr<UTextBlock> IndexText;

	/** トラック名 */
	UPROPERTY(BlueprintReadWrite, meta = (BindWidget))
	TObjectPtr<UEditableTextBox> TrackNameText;

	/** 音量 */
	UPROPERTY(BlueprintReadWrite, meta = (BindWidget))
	TObjectPtr<UTextBlock> VolumeText;

	/** トラック詳細(保存用) */
	UPROPERTY(EditAnywhere, BlueprintReadWrite, meta = (ExposeOnSpawn = true))
	FTrackDetail TrackDetail;

protected:
	virtual void NativePreConstruct() override;

private:

	// 表示内容更新
	void RefreshTexts();
};
# | point |
① | Since we'll be using FTrackDetail, include DataClass/FTrackDetail.h (it's in the SILVER module). |
② | The `meta = (BindWidget)` attribute is used to link the three part names assigned in the designer. |
③ | Add `ExposeOnSpawn = true` to TrackDetail (this has the same meaning as "Expose on spawn" in Blueprint). |
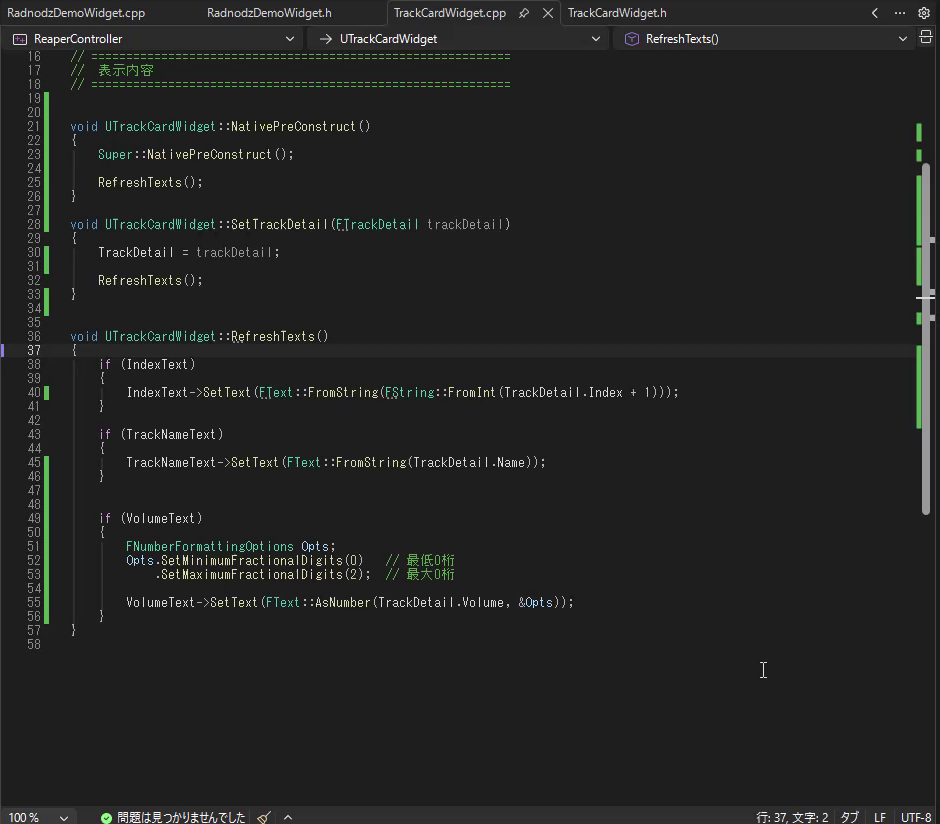
TrackCardWidget.cpp
#include "TrackCardWidget.h"

#include "Components/TextBlock.h"
#include "Components/EditableTextBox.h"

void UTrackCardWidget::NativePreConstruct()
{
	Super::NativePreConstruct();

	RefreshTexts();
}

void UTrackCardWidget::SetTrackDetail(FTrackDetail trackDetail)
{
	TrackDetail = trackDetail;

	RefreshTexts();
}

void UTrackCardWidget::RefreshTexts()
{
	if (IndexText)
	{
		// Index は 0 始まりなので +1 して表示する
		IndexText->SetText(FText::FromString(FString::FromInt(TrackDetail.Index + 1)));
	}

	if (TrackNameText)
	{
		TrackNameText->SetText(FText::FromString(TrackDetail.Name));
	}

	if (VolumeText)
	{
		FNumberFormattingOptions Opts;
		Opts.SetMinimumFractionalDigits(0)   // 小数点以下 最低 0 桁
			.SetMaximumFractionalDigits(2);  // 小数点以下 最大 2 桁

		VolumeText->SetText(FText::AsNumber(TrackDetail.Volume, &Opts));
	}
}
This is the same process as the one implemented in the Blueprint.
NativePreConstruct() ... Equivalent to Blueprint's Event PreConstruct
SetTrackDetail() ... Receives FTTrackDetail from an external source and updates the display.
The volume is formatted to two decimal places using FNumberFormattingOptions (-3.8172… → -3.82).
② Changes to RadnodzDemoWidget.h

class UButton;
class UEditableTextBox;
class UTextBlock;
class URadnodzClient;
class UScrollBox;                // ← 追加
class UTrackCardWidget;          // ← 追加

UCLASS()
class REAPERCONTROLLER_API URadnodzDemoWidget : public UUserWidget
{
	GENERATED_BODY()

protected:
    virtual void NativeConstruct() override;
    virtual void NativeDestruct() override;

    // ---- UMG のパーツと結びつける ----
    // ここの変数名は、Widget Blueprint 側のパーツ名と完全に一致させること
    UPROPERTY(BlueprintReadWrite, meta = (BindWidget))
    TObjectPtr<UEditableTextBox> IpTextBox;

    UPROPERTY(BlueprintReadWrite, meta = (BindWidget))
    TObjectPtr<UEditableTextBox> PortTextBox;

    UPROPERTY(BlueprintReadWrite, meta = (BindWidget))
    TObjectPtr<UButton> ConnectButton;          // ← RenameButton から変更

    UPROPERTY(BlueprintReadWrite, meta = (BindWidget))
    TObjectPtr<UTextBlock> StatusText;

    UPROPERTY(BlueprintReadWrite, meta = (BindWidget))
    TObjectPtr<UScrollBox> TrackList;           // ← ① 追加

    UPROPERTY(BlueprintReadWrite)
    TObjectPtr<URadnodzClient> Client;

    UPROPERTY(EditDefaultsOnly, Category = "UI|TrackCard")
    TSubclassOf<UTrackCardWidget> TrackCardClass;   // ← ② 追加

private:
    UFUNCTION()
    void OnConnectClicked();                    // ← OnRenameClicked から変更

    /** 未接続なら Connect する。成功したら true。失敗理由は StatusText に出す。 */
    bool EnsureConnected();

    void SetStatus(const FString& Message);

    // エラー情報からステータス表示
    void DisplayError();                        // ← ③ 追加

    // トラックリスト取得
    void GetTrackList();                        // ← ③ 追加
};
The changes from last time are as follows:
# | change | Content |
— | Delete NameTextBox, change RenameButton to ConnectButton. | Adapting to Blueprint UI changes |
① | Added TrackList (UScrollBox) | Box to put the list in |
② | Added TrackCardClass | The class of the template to be generated |
③ | Added DisplayError() / GetTrackList() | Error display and list retrieval |
The TrackCardClass in ② is the key point when working with templates in C++.
You don't directly write the asset name WBP_TrackCard in your C++ code . Instead, you use a variable TSubclassOf that can hold any class that inherits from UTrackCardWidget. specify which widget to use in the editor .
This way, when you create cards with different appearances (such as WBP_TrackCard_Compact), you only need to replace them in the editor without having to rewrite the C++ code. EditDefaultsOnly specifies that the default values for the class can be set from the editor.
③ Changes to RadnodzDemoWidget.cpp
include
#include "RadnodzDemoWidget.h"
#include "TrackCardWidget.h"                // ← 追加

#include "RadnodzClient.h"
#include "RigdocksError.h"                  // AZ_ErrorCode
#include "RigdocksSilver_Track.h"           // ← 追加:トラック操作(AZ_GetTrackListDetail)

#include "Components/Button.h"
#include "Components/EditableTextBox.h"
#include "Components/TextBlock.h"
#include "Components/ScrollBox.h"           // ← 追加
The RigdocksBronze_MediaItem.h file, which was used for renaming last time, has been deleted this time because we are not manipulating media items.
NativeConstruct
void URadnodzDemoWidget::NativeConstruct()
{
    Super::NativeConstruct();

    // メッセージ初期化
    StatusText->SetText(FText::GetEmpty());

    // ボタンが押されたら OnConnectClicked を呼ぶよう登録する
    if (ConnectButton)
    {
        ConnectButton->OnClicked.AddDynamic(this, &URadnodzDemoWidget::OnConnectClicked);
    }
}
DisplayError (Error message)
This is equivalent to the "Error Display" macro in the Blueprint version.
void URadnodzDemoWidget::DisplayError()
{
    FRigdocksError error = Client->GetError();

    SetStatus(FString::Printf(TEXT("接続失敗 (%d): %s %s"), error.ErrorCode, *error.Message, *error.Details));
}
GetTrackList (Get Track List)
This is the main topic of this post.

// トラックリスト取得
void URadnodzDemoWidget::GetTrackList()
{
    // ① Designer で作った WBP_TrackCard を生成しないと、画面構成が無く何も表示されない
    if (!TrackCardClass)
    {
        SetStatus(TEXT("TrackCardClass が未設定です"));
        return;
    }

    // ② リスト全削除
    TrackList->ClearChildren();

    // ③ トラック情報をまとめて取得(第 2 引数 0 = いま開いているプロジェクト)
    TArray<FTrackDetail> TrackDetails = URigdocksSilver_Track::AZ_GetTrackListDetail(Client, 0);

    // ④ 成否判定
    if (Client->GetError().ErrorCode != static_cast<int>(AZ_ErrorCode::Success))
    {
        DisplayError();
        return;
    }

    // ⑤ トラックの数だけカードを生成して並べる
    for (const FTrackDetail& trackDetail : TrackDetails)
    {
        UTrackCardWidget* Card = CreateWidget<UTrackCardWidget>(this, TrackCardClass);

        Card->SetTrackDetail(trackDetail);

        TrackList->AddChild(Card);
    }

    SetStatus(FString::Printf(TEXT("トラックを %d 件取得しました"), TrackDetails.Num()));
}
# | process | Blueprint version |
① | If TrackCardClass is not set, the process will be interrupted. | (Specifying the class in Create Widget) |
② | ClearChildren() clears the list. | Clear Children |
③ | Get all tracks using AZ_GetTrackListDetail(Client, 0). | AZ_GetTrackListDetail |
④ | Success or failure is determined by the ErrorCode of GetError(). | |
⑤ | CreateWidget → SetTrackDetail → AddChild | For Each Loop → Create Widget → Add Child |
Regarding ③ : AZ_GetTrackListDetail is a static function, just like the other AZ_*** functions, and its first argument is client. If you pass 0 (nullptr) to the second argument project, it will target the project currently open in REAPER. This is equivalent to unconnecting the Project pin in Blueprint.
Regarding ⑤ : CreateWidget creates the widget specified by `TrackCardClass` (= `WBP_TrackCard`) . If you pass `UTrackCardWidget::StaticClass()` here, an empty widget will be created that does not have the appearance created in the designer, and nothing will be displayed.
OnConnectClicked (button pressed)
void URadnodzDemoWidget::OnConnectClicked()
{
    // ---- 1. クライアントを用意する(初回だけ生成し、以降は使い回す)----
    if (!Client)
    {
        Client = URadnodzClient::CreateRadnodzClient();
    }

    // ---- 2. 接続する ----
    const FString Ip = IpTextBox->GetText().ToString();
    const FString Port = PortTextBox->GetText().ToString();

    if (!Client->Connect(Ip, FCString::Atoi(*Port)))
    {
        DisplayError();
        return;
    }
    SetStatus(TEXT("接続に成功しました"));

    // ---- 3. トラックリスト表示 ----
    GetTrackList();

    // ---- 4. 切断 ----
    Client->Disconnect();
}
The process is the same as in the Blueprint version: "Press the connect button → Connect process → Get track list → Disconnect".
④ Build
As before , close the UE editor and then build in Visual Studio (since we've added a new class, a regular build is more reliable than live coding).
Replace the parent class of the Widget Blueprint.
We will link a C++ class with a Widget Blueprint. In this case, we will replace the parent class of two widgets.
① Change the parent class of WBP_TrackCard to TrackCardWidget
Open WBP_TrackCard and switch to the Graph tab.
Click ① Class Settings on the toolbar .
In the details panel, click on ② Parent Class , and then select ③ TrackCardWidget .

Click Compile → Save.
If the names of IndexText, TrackNameText, and VolumeText do not match those of the C++ BindWidget, a compilation error will occur here.
*Please delete the trackDetail variable and Event PreConstruct node created in Blueprint, as their roles overlap with those on the C++ side (TrackDetail / NativePreConstruct). Leaving them in will result in errors due to duplicate names or the same process being executed twice.
② Change the parent class of WBP_RadnodzDemo to RadnodzDemoWidget
The parent class of WBP_RadnodzDemo has already been changed to Radnodz Demo Widget in the previous article. If you haven't done so yet, please change it using the same procedure as in 7-1.
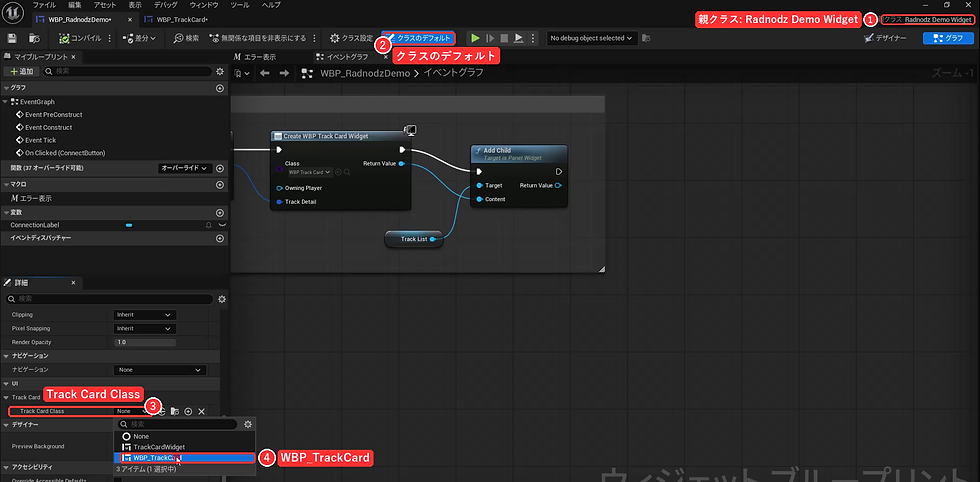
There's one more important setting to consider here . For TrackCardClass, specify WBP_TrackCard, which will be used as the template .
Open WBP_RadnodzDemo and switch to the Graphs tab.
Make sure that the parent class in the upper right corner is set to ① Radnodz Demo Widget .
Click on the default class in the toolbar (②).
In the details panel, under UI > Track Card, open the ③ Track Card Class dropdown and select ④ WBP_TrackCard .
Click Compile → Save.
*Please delete the Blueprint nodes (connect button press, connection process, track list acquisition, disconnection) as they will be executed twice in the C++ version as well.
Let's try it
Open the project containing the track in REAPER and verify that the RADNODZ server is running.
I'll play it in UE .
Verify the IP address (127.0.0.1) and port (12345), then press the connect button.
If "Connection successful" is displayed in StatusText and the REAPER tracks are listed below it as cards, then the connection was successful.

If the track doesn't fit within the frame, you can scroll using the mouse wheel.
If you change the track name or volume in REAPER and then press Connect again, the list will be recreated to reflect the latest information (because Clear Children deletes the old cards before adding them).
Troubleshooting steps if it doesn't display correctly:
Symptoms | Confirm |
"Connection failed" is displayed. | Is the REAPER server running? / Are the IP address and port correct? |
The message "TrackCardClass is not set" is displayed. | Did you specify WBP_TrackCard as the Track Card Class in 7-2? |
It says "〇 items retrieved," but I can't see the card. | Have you selected TrackCardWidget (a C++ class) for the Track Card Class? |
The card is dispensed, but it's empty (remains at 0). | Check if the part names of WBP_TrackCard are IndexText / TrackNameText / VolumeText. |
AZ_GetTrackListDetail not found / Link error | Did you add RigdocksSilverPlugin to Build.cs? |
Pressing the button will run the process twice. | Did you delete the node on the Blueprint side? |
summary
I've modified the ReaperController I created last time so that the REAPER track list can be displayed on the UE screen.
The key points this time are the following three:
AZ_GetTrackListDetail allows you to retrieve all information at once—name, volume, number, etc.—in a single communication. This is efficient in situations like displaying a list.
Create a separate widget (WBP_TrackCard) for each row and use it as a template —the visual adjustments are done only in the template, and the arrangement process remains the same regardless of the number of tracks.
In C++, you specify a template using TSubclassOf —you don't write the asset name in the code; the editor's class default determines which widget to use.
The way you call the API is exactly the same as last time. Just add the rank module you'll be using to Build.cs, call AZ_*** with client, and check the success or failure with Get Error. As long as you understand this format, you'll be able to write code without hesitation even if the target changes from media items to tracks.
The tracklist we've created can be further developed.
development | Hint |
Rewrite track names from UE | Since TrackNameText is an Editable Text Box, the event upon confirmation calls the FTtrackDetail.Track API to set the track name. |
Change the volume from UE | Pass FTrackDetail.Track to methods like AZ_SetTrackItemAddVolume. |
Show only the selected track. | Replace with AZ_GetSelectedTrackListDetail |
Folder structure is represented by indentation. | The left margin of the WBP_TrackCard changes depending on the value of FTrackDetail.Depth. |
The FTrackDetail's Track property contains a reference to the REAPER track itself, allowing you to call other APIs on a track selected from the list . Please give it a try.
Required Plan
RIGDOCKS -RADNODZ 1.0.0-
RIGDOCKS -SILVER 2.0.0 and later-
Detailed documentation
The project created this time is available for download below.
LINK
For those who are new to Reaper or considering subscribing to a plan.
See below for the [REAPDOCK]Script documentation.
For a list of APIs used in [APIDOCK]Script, please refer to the following table of contents page.




![[Reaper x UE5] I created an app to control Reaper using RIGDOCKS' new RADNODZ feature! [Connection Test Edition]](https://static.wixstatic.com/media/4643d6_f4bb3024cc4a498eadc1802c65a335f7~mv2.gif/v1/fill/w_952,h_490,al_c,pstr/4643d6_f4bb3024cc4a498eadc1802c65a335f7~mv2.gif)
![[RIGDOCKS: Installation Guide] Trying out the "Trial Version" and "Multi User Licese"](https://static.wixstatic.com/media/daf646_7844133e165046d8b25cb617c920c5c8~mv2.jpg/v1/fill/w_980,h_551,al_c,q_85,usm_0.66_1.00_0.01,enc_avif,quality_auto/daf646_7844133e165046d8b25cb617c920c5c8~mv2.jpg)
