
[Road of SKYSQUARE-037-] Internet connection installation ~Starlink~
- Dec 24, 2025
- 9 min read
![[Road of SKYSQUARE-037-] Internet connection installation ~Starlink~](https://static.wixstatic.com/media/fc32ca_6d01bc74aea14839a8121cad74e411f1~mv2.jpg/v1/fill/w_980,h_551,al_c,q_85,usm_0.66_1.00_0.01,enc_avif,quality_auto/fc32ca_6d01bc74aea14839a8121cad74e411f1~mv2.jpg)
Hello
This is Nakajima from AZSTOKE Co., Ltd.
It is the purpose of this project.
Improving the Internet Environment on the Mountain! SKYSQUARE's Path to Starlink Implementation
SKYSQUARE is located in the mountains of Yamanashi Prefecture.
The biggest problem with this place was the weak internet connection.
Up until now, I have considered all kinds of line procedures, and was unable to sign up for a fiber optic line in the first place, so I have been trying out docomo's "home 5G" which I was able to sign up for, and have been trying it out repeatedly.
However, the result was around 10Mbps download .
It was too unreliable to use for work or services, and we were left with no choice.
Therefore, the satellite communications service "Starlink" was chosen as the final solution to break the current situation.
However, Starlink is not something that can be simply placed.
For stable communication, a completely open sky (with no obstructions) is essential.
After thoroughly checking the site using a dedicated app, the only potential location we found was a small area near the entrance.
Furthermore, it was discovered that in order to avoid the surrounding trees and ensure a stable signal, the antenna needed to be placed about four meters above the ground .
Since the installation would be at a high altitude in a conspicuous location near the entrance, we decided to hire a professional contractor to ensure reliable construction.
Will the internet environment on the mountain really improve dramatically?
We bring you the story of our struggle to introduce Starlink.
Click here for a list of previous SKYSQUARE Road articles

■Table of Contents
1. The proposed location is "near the entrance." The only place with an open view of the sky.
When introducing Starlink, the first thing we had to do was find a place to place the antenna.
Because Starlink communicates directly with satellites, even the slightest tree branch or building blocking the sky will immediately cut off communication.
Finding a place without any obstructions was extremely difficult in SKYSQUARE, which is surrounded by mountains.

After scanning the premises using a special app, we finally found a spot near the entrance that we thought would work.
Compared to other locations, there is less interference from the surrounding trees, and the sky is the widest. This location can truly be called the "hub of communications" at SKYSQUARE.
However, if you just place it on the ground, there will still be obstacles around it, which can be a bit worrying.
In order to make the most of the potential of this location, we will be considering an installation plan that will increase the height even further.
2. Excavators are deployed! Excavation work for the foundation
Once the installation location has been decided, the next step is to create the base for erecting a sturdy pole to support the antenna.
Installing an antenna at a height of 4 meters means it is susceptible to wind, so the base needs to be very sturdy.
So we started by digging holes in the designated locations to bury the concrete foundations.

This is where our company's excavators come in handy!
This time, we lent this equipment to the construction company to help them with their work.
Having a bulldozer is really helpful for mountain work, DIY projects, and even infrastructure development like this.

Digging by hand would be a daunting task, but with heavy machinery it was done in a flash. A clean, deep hole was dug, large enough to fit the concrete foundation perfectly.
Seeing the preparations progressing steadily one by one like this makes me excited that the internet environment is finally improving.
3. Prepare and cut the pole to 4m for ease of maintenance
While preparing the base, we are also working on the pole that will support the antenna.
The pole we prepared this time is a large one that stands 6 meters above the ground when left as is.
However, if it is too expensive, it will be very difficult to maintain in the future, such as adjusting the antenna direction or replacing equipment.
Therefore, I decided to have the pole cut short so that if anything were to happen in the future, I would be able to handle it myself using a 4m class aerial work platform.

The pole is skillfully cut, sparks flying.
Considering the balance between the site conditions and the mobility we had (such as aerial work vehicles), we arrived at the optimal solution of "four meters above ground level."

We have also made some improvements to the tip of the pole.
To ensure smooth and secure installation of the Starlink antenna, we had a special attachment (60mm in size) pre-attached.
4. A little extra effort to make it beautiful. Wiring inside the pole
Before erecting the pole, there is one more important step: creating a hole for the Starlink cable to pass through inside the pole.
By running the cable through the pole instead of on the outside, not only does it look neater, but it also protects the cable from the harsh UV rays, rain and wind of the mountains.

This is where the grinder comes in.
A hole is drilled in the metal pole just large enough to fit the PF pipe used to protect the wiring.
Taking into account the thickness of the PF pipe, the size was carefully determined and cut to avoid any rattle.
It's a delicate process that can result in sparks flying.

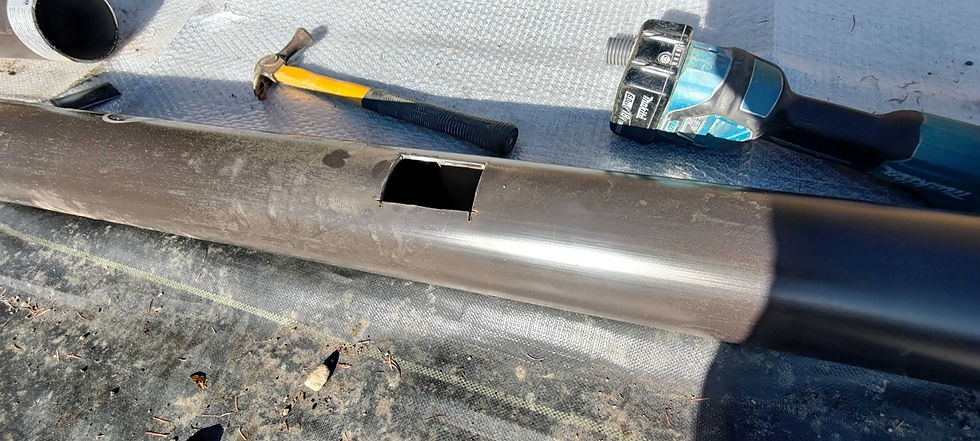
We also carefully removed the burrs so as not to damage the cable on the cross section.
Now we are ready to smoothly pull the cable coming down from the antenna inside and neatly pipe it.
Although it may seem like a mundane task at first glance, these small "on-site ingenuity" contribute to the beauty and durability of the final finish.
5. Struggling with heavy loads! Installing the concrete base
Once the holes have been dug and the poles have been prepared, it's time to install the concrete base.
This time, we prepared a fairly large and heavy base to support a 4-meter pole.
Of course, it's not heavy enough to be lifted by hand.
This is where our excavator comes in handy again.

First, we carefully lift up the foundation that arrives loaded on a truck.

Operate slowly and precisely to avoid losing balance.
This is the moment when you really get a feel for the power of the excavator. Then, we carry it into the hole that we dug beforehand.


It fits perfectly in the hole! Now it's time for some fine tuning.
Make sure the base is level so that the pole stands straight and vertical.
If this is not properly aligned, it will affect the direction and appearance of the antenna later on, so this is the most delicate task.

Once the level is perfectly determined, the surrounding soil is pushed back with a shovel and compacted.
As the soil is filled in, the foundation sits firmly in the ground, and it is reassuring to see an unshakable ``foundation'' being created.
Now we have completed the "ultimate platform" to welcome the Starlink pole!
6. Finally erected! Starlink takes to the sky
Once the foundation is solidified, it's time for the main event: installing the poles.
It's difficult to set up a 4-meter pole and then work at a high altitude, so we first lay it down on the ground and complete all the preparations.

First, pass the cable through the hole you just made.
Be careful not to break the wire.


Then, the Starlink antenna body is firmly fixed to the tip of the pole!
You can install it while checking it carefully on the ground, so it is much more reliable.

Once everything is ready, the pole is slowly raised using heavy machinery again.
The sight of the 4-meter pole rising vertically is truly impressive.
Insert it vertically into the hole in the base and fine-tune the final position.

Once the position is decided, pour a generous amount of mortar into the gap between the base and the pole.
Once this hardens, you will have the strongest antenna pole that can withstand strong winds.

To finish, we leveled the mortar evenly and the installation was finally complete!
The Starlink antenna towering majestically near the entrance truly makes SKYSQUARE the "fortress of communications."
It looks beautiful and the finish is perfect.
7. Finally completed! The day when the "super-fast" sky arrived at SKYSQUARE

Its location on top of a mountain and the high walls of trees surrounding it.
Until now, SKYSQUARE's internet environment had been limited to around 10Mbps with "docomo home 5G," but this single antenna has brought about a dramatic change.
After installation, I immediately ran a speed test and the problem was finally solved!!!
SKYSQUARE Internet Speed
Download: 281.0MB
Upload: 15.7MB

Although it was a tough location near the entrance, thanks to the 4-meter height, the Starlink app displayed a perfect status of "good visibility (no obstructions)."

This has enabled us to carry out our work and services so smoothly that it's hard to believe we're in the middle of the mountains.

The fact that we were able to overcome the major challenge of "no internet connection" in the mountains of Yamanashi using the latest technology and painstaking setup work is a huge step forward in the future operation of SKYSQUARE.
Great location, great internet.
We are looking forward to providing everyone with a comfortable stay at the newly renovated SKYSQUARE!
8. Epilogue: The unexpected "16 degree" discrepancy was discovered...!?
Just when I was feeling relieved that the internet was connected,
As I was taking another look at the Starlink app, a shocking notification caught my eye.
"The antenna orientation is about 16 degrees off from the ideal angle."
Although I thought I had placed it perfectly, it seems that it was slightly off the optimal angle for capturing satellites...
I was honestly surprised that the Starlink app allows you to check such detailed information.

I thought, "I had already had a contractor set it up!", but if I had to call the contractor again, it would naturally mean additional costs.
Having witnessed the installation process up close, I am thinking of trying to make some fine adjustments with my own hands at a later date.
However, even though it is currently 16 degrees off, the communication speed is much better than before and I am able to use it very comfortably.
For now, I plan to enjoy this environment and then try some "self-adjustment" when the time is right.
Creating an internet environment in the mountains is not an easy task.
However, this trial and error is what makes developing SKYSQUARE so exciting.
Please look forward to the "Self-Adjustment Edition" in another blog!
SKYSQUARE Article List
[Road of SKYSQUARE-035-] Increasing convenience ~Collection~ [Road of SKYSQUARE-034-] Moving towards realization! 11th qualification ~Handling~
![[Road of SKYSQUARE-036-] It looks like you'll need to work at height ~Height~](https://static.wixstatic.com/media/fc32ca_d89c3f113c9b42f6bf62f1bffb2cdce0~mv2.jpg/v1/fill/w_980,h_551,al_c,q_85,usm_0.66_1.00_0.01,enc_avif,quality_auto/fc32ca_d89c3f113c9b42f6bf62f1bffb2cdce0~mv2.jpg)
![[Road of SKYSQUARE-035-] Increasing convenience ~ Collection ~](https://static.wixstatic.com/media/fc32ca_1e4fbba933a3444eb291d7758daf800c~mv2.jpg/v1/fill/w_980,h_551,al_c,q_85,usm_0.66_1.00_0.01,enc_avif,quality_auto/fc32ca_1e4fbba933a3444eb291d7758daf800c~mv2.jpg)